

I’ve been getting into Ultralight backpacking slowly over the past few years. It was time to upgrade my tent, and I really wanted an HMG Ultamid 4. They go for >$800, and that’s really expensive. In all other parts of my life, I try to make things whenever I can. Therefore, I decided to make my own DCF (Dyneema Composite Fabric) Pyramid tent.
(Since this article was written in 2020, we’ve gotten MUCH more into Ultralight backpacking – check out our cottage gear company theveryleast.co.nz! -CF ’24)
If you have never heard of pyramid tents, they’re pretty straight forward: it’s a tent that’s a pyramid. They are generally 4 sided with each corner staked in, then a pole goes in the middle to provide the tension. This walkthrough makes a floorless tarp, which is incredibly lightweight and ideal for some conditions; however, sometimes an inner net is needed and you can either make your own or buy an inner net. Like most ultralight tents it isn’t freestanding, which is a deal breaker to some. But if you’re looking up MYOG Pyramid tents, I bet you’ve accepted that already. Take a look at Max Neale’s review of the Ultamid 4–he’s a very experienced Alaskan adventurer, and he sings high praise about them. They are very stable in wind and weather, spacious, and lightweight.
I chose a pretty large pyramid (often called a ‘mid’) so that I could have more flexibility. It can accommodate 4 people in a pinch, or 2 people with room to cook on a rainy trip. It can be used as a base camp for a backcountry skiing trip, or a cooking hut for a larger winter camping trip. If you want, you can make it smaller. That’s the nice thing about MYOG–make exactly what you want!
Dimensions: 8.5’x8.5′ footprint, 6′ height
Weight: 600g/21.16oz (without stakes, with corner and mid point guylines)
Total spent: $400-$450
Time taken: Probably 3 whole weekends over the span of 4 months
Sense of Pride & Accomplishment: Off the charts
Let’s plan a bit
Alright, enough intro, lets get into it. There are a number of tools you need to do this the way I did (I’ll get into materials later):
- A sewing machine that can sew in a straight line
- Sharp scissors
- A long table (not necessary, but managing the bulk of the tent is something that other tutorials don’t warn you about); I used my parents’ ping pong table
- Mini clamps to keep long seams together before they’re sewn, I got mine at Home Depot–make sure they have the rubberized tips
- Larger clamps to hold the fabric sheets to the table, mostly when cutting. Could probably use heavy weights for this, but they would have to be very heavy since DCF is quite slippery
- A long, straight piece of metal or wood (at least 7.5′ long) to measure and draw the edges onto the fabric
- A 90° square to ensure you’re making corners well
If you’ve got the tools, now it’s time to make some decisions about your tent that will affect your path moving forward:
Decision 1: Fabric
I used Dyneema Composite Fabric, aka DCF. It’s sort of the cutting edge of tent fabric right now. It is strong, windproof, waterproof, and ultralight. On the other side, it’s quite expensive and it doesn’t pack down nearly as well as the SilNylon many are used to. (edit Sept 2023: UltraTNT is an excellent, DCF-like material that is coming to market soon, and is about half the cost. Keep an eye out!)

These steps will all be using DCF, but SilNylon or SilPoly could be used as well. They are both waterproof and lightweight, and they are much cheaper than DCF. However, they aren’t quite as light or strong and you would have to seam-seal the seams (with a viscous adhesive) rather than tape them, and there may be more fabric-specific things I don’t know about.
Moving back to DCF, you have to choose what weight of DCF you want to use. Heavier DCF is stronger and has a longer lifespan, but the whole point of this is to reduce weight. Most fabrics are measured in ounces per square yard, which I’ll abbreviate as oz/y^2. Personally I chose 1.0oz/y^2 DCF, since I want to use this for many years in all seasons. I think a summer-only tent could use a lighter weight, though I wouldn’t personally go down to the .51oz/y^2.

Decision 2: Dimensions
I chose a fairly large footprint of 8.5’x8.5′ with a peak of 6′. This is actually the widest I could make it using Ripstop by the Roll (RSBTR)’s fabric, which is 54″ wide (4.5′). The height I sort of estimated, but it turned out a good height. This is very large for a solo trip, and probably even a bit large for a trip with just my wife and I, but I wanted the flexibility it provides.
I will move forward using my dimensions, but I will walk through the math so you can calculate your own. The smaller your footprint the shorter your ‘mid should be, which will be more cramped, but less affected by the wind.
Decision 3: Catenary cut or not
A catenary curve is (roughly) defined as the curve of a rope/chain/string caused by gravity. In tents and tarps, you can curve the ridgelines to make it easier to pitch it tightly, see this tarp.
Pyramid tents have four ridgelines, one on each corner. I felt it was apt to give it a cat(enary) cut, especially because DCF doesn’t stretch like SilNylon. This means that SilNylon will stretch to accommodate any uneven pitches and make it taut, but DCF will just distort the pitch. I wanted to give myself all the help I could get to make a tight pitch. If you decide not to give it a cat cut, it will make it mildly easier and you can skip a few steps. I recommend doing a mild cat cut.
Commit to it
Once you’ve made the decisions above, it’s time be to confident in yourself and commit to the project. You got this! Buy some materials, carve out a few weekends. It took my wife Kadi and I probably 3-4 entire weekends to do this, but much of it was spent deliberating and thinking about how to do things, so I’m really hoping I can take that out of the equation for you.
MATH
Speaking of equations, we can’t buy materials until we know our dimensions. You have to decide on the width and the height to figure out how much fabric to buy. I decided I wanted 8.5′ sides with a 6′ height.
With these two dimensions, we can figure out how big the sides will be. Each side will be made of two fabric panels. We will be working with two different triangles here –one is a theoretical triangle to figure out the dimensions of the panels (labelled B in following pictures), and the other is the calculated real panel size (labelled A in following pictures).


We use the Pythagorean Theorem to calculate the side lengths, since they are right triangles. I am only calculating based on one of the two panels, so side 1 is 4.25′ (half of the 8.5′ total side, labelled in red), and the height is 6′ (blue), so this gives us a side panel length of 7.35′ (orange). Since this is now our actual panel height, we use it to calculate the final corner line to be 8.5′ (green). See the first picture to understand this better, or ask me, this is easily the most confusing part of the process!
edit 11/2021: Just found this super useful link.
edit 2/2022: if you want a larger tent, you can do it this way, like HMG does theirs
Since these are triangles, it makes it really easy to put them head-to-tail to fit them on contiguous lengths of fabric bought on a roll. Each of the four sides takes up about 7.5′ x 4.5′ (I add a 1/2″ seam allowance all the way around). That puts us at 7.5′ per side x 4 sides = 30′ of fabric! This is super tight though, I used the edges of the fabric as the actual edges and I barely had enough room for the 1/2″ seam allowance. If you want to have a little extra fabric you could consider getting another 1/2 yard to make sure, but that’s pretty expensive, so you can just be sure you’ve measured correctly!

This works out perfectly for buying fabric by the yard, since it is exactly 10 yards! I believe RSBTR can only do max 25′ individual sections, so if you buy from them like I did, you would have to split it up into two sets of 15′ (or 5 yards) each.
Other Materials
Update September 2021: Since writing this post, I’ve had a good relationship with Ripstop By The Roll, and I’ve been lucky enough to get into their affiliate program. As such, I’ve updated a few of these links to be affiliate links–but this hasn’t changed the content of the post otherwise.
So you’ve figured out how much fabric you need, but there are a number of other things necessary for you to complete the project:
- LineLocs: to be sewn into your corners for guylines. Need at least 4, these come in a pack of 12.
- Zipper: this comes in white or green if you want! Get the larger #5. I made my zipper 6′ long.
- Zipper Pull: certainly nobody would forget to buy these!…would they…? Certainly not me. I used two pulls on my zipper, so it can be unzipped from the top for ventilation or the bottom for general entry.
- Mitten Hooks: optional, I will be using them for accessory attachment (Ground cloth, headlamp hook, etc).
- Cordage: I got this 3mm cord that works really well with the line-locs. I originally got some Amsteel cord, which you may see in the assembly pictures (black/white), but it was too thick and didn’t work well with the hardware.
- Grosgrain ribbon: This is used to make tie-outs, attach the linelocs, and reinforce areas if needed. I accidentally used 3/8″, you should use 1/2″, since the Linelocs are meant to be used with that width.
- Thread: full polyester thread, I used black. Got two spools, nearly went through one.
- Thicker DCF: to be used for the top cone and various reinforcements (line tie-outs, corners etc), a half yard should be fine. White looks nice.
- 1″ Double sided tape: This specially formulated adhesive will be used to put a 1/2″ hem all the way around the bottom perimeter of the tent, as well as for making reinforcement patches for all the places needing reinforced with the aforementioned thicker DCF. Strange that Digikey is the best supplier, since they’re an electronics distributor, but it was the best place I could find thicker than 1/2″.
- DCF cover tape: Since we are sewing DCF, we’re poking a bunch of holes in it. To get the seams waterproof again, we need to cover them with DCF tape. My original source of tape on a roll has stopped selling it, so I now recommend making your own with the 1″ double sided tape linked above. Buy a yard of .51oz/y^2 DCF to make into strips.
The Process
Alright, I think we’ve finally dug down to bedrock, and now we can start mining for diamonds. It’s time to start making a tent.
I made a paper model before I even got any materials, and it really helped me visualize everything. I think it would be a good idea to do so yourself. I used a free CAD program called QCAD to design this, and it allows you to print nicely to letter-sized paper to cut out. I can send the files if you ask!

Kadi and I made a ripstop nylon half tent to figure out how to do the sewing and fine-tune the process, especially because I’d not done any sewing for at least 5 years.
I would recommend doing this mock tent if you’re a novice sewer. If you don’t want to do the whole thing, I think you should do just one of the long, cat-cut seams so you understand the process before sewing into the very expensive fabric you’ve bought. Looking ahead, we use this seam that you can practice here. Plus, ripstop nylon is really cheap most places.

Catenary Cut tool
If you’ve decided to do a catenary cut, you need to make a tool to help you make consistent curves. I did this by stapling 8.5′ of foam board (the length of the longest side, see the green edge of triangle A above) to a long 1×2, attaching some string to the corner on both ends, then spray-painting the string to make a mask of the string’s curve. I gave the string a 3″ deflection in the middle.


You can then cut the foam board along the line, and you have a consistent curve form! I think you could use cardstock/cardboard to better effect, since I couldn’t cut the foam board with scissors easily.

Measuring, Marking, and Cutting
Once you’ve made your cat tool, it’s time to start measuring and marking. Sharpies work great to mark the DCF, and you can get rid of the marks after the fact using rubbing alcohol. I didn’t, so you can see marks in some places. I think it gives it character.
I didn’t take a picture of it, but I used a long piece of scrap wood to make a tool for marking my 7.35′ (7′ 4.2″) and 4.25′ (4′ 3″) measurements. I used a large square to make sure I was making 90° corners.
We added an extra 1/2″ seam allowance to the edge of each measurement. That meant we had the exact panel dimensions marked, then another larger triangle outside of that one by 1/2″. You would then cut the outside triangle.

DCF is super fun to cut if you have really sharp scissors. We all know that feeling when the scissors start to glide through wrapping paper; well, you get to do that for probably 30 yards in this project! I would clamp both sides of the fabric I was going to cut, then cut along the line all the way to the other side.

I made mine with two different shades of DCF (you can’t tell, unfortunately) so I had to worry about making sure I had the correct number of right vs. left triangles. If you use the same color throughout, they’re reversible so you don’t have to worry about it.
Once you’ve measured and cut all your panels, you should reinforce the bottom 4.25′ edge of each triangle by taping the 1/2″ seam allowance back onto the fabric with the double sided tape (folding the 1″ tape in half onto itself) to give the very bottom a little extra strength and extra fabric when we sew the tie-out points on.

Now it’s time to start sewing!

Sewing
We used a top-stitched french seam for all the seams. This was very labor intensive, since it takes 3 lines for each seam, but they’re strong seams and they lay flat.
Kadi helped immensely with sewing and me keeping my sanity. There’s lots of sewing, so we took turns to make it easier for both of us.
These little clips worked amazingly as a pin replacement. We put one every 4″ or so, then would take them off as we sewed up to them.

We sewed the panels on consecutively: we would sew a long cat-cut edge, then a shorter middle edge, then a long edge, etc. Remember that the zipper is going to be sewn onto a middle edge, so at the end you should have two middle edges left to sew the zipper halves.
It is more important to have the bottom edge straight than the top corner (since it will be covered anyway), so start by aligning the bottom edge and clip up from there.
Eventually (hours later), you will sew all the panels together, with the final zipper side remaining. I think I made mine 6′ long, leaving just over a foot left to sew at the top of this seam.
The very tip of ours looked like a mess after all these were sewn up, so don’t worry if it doesn’t look great! We’ll be covering it with a cap later!
Zipper
Sewing the zipper on is next, for which we used the zipper foot attachment for our sewing machine. As before, we used the small clips and removed them as we went. I accidentally sewed mine on inside-out, the teeth are supposed to be on the inside for waterproof zippers. D’oh.

I didn’t take any more pictures of the zipper process, and I apologize. Let me know if you have any questions about it, but I will explain it best I can:
To start, we couldn’t figure out a way to do the french seam for the remaining ~1.5′ of the final panels, so we did a simple double stitch overlapping the two panels above where the zipper will end. We will be taping it on both sides for a little extra strength.
We sewed the zipper on all the way starting at the bottom (both halves still together). We then brought the other side of the tent in, aligned the bottom edge of the tent on both sides, and sewed just the start of the other side of the zipper. After the bottom edge is started, you can ‘unzip’ the whole zipper (pull it apart) and put the first zipper pull on, joining the halves again. It takes a little bit of pushing to get it on, you have to fiddle with it.
After putting the first zipper pull on and zipping it all the way to the top, you can put the second zipper pull on to open the tent for easier sewing. At this point you can clip the fabric to the zipper to keep it in place.
Once we sewed all the way to the top, double check that the bottom lines up. You can take the pulls off and realign the teeth if needed. For the very top of the zipper, I sewed back and forth over it a couple times to finish it, then taped about 2″ on the top to close the hole.

Tie-outs and Reinforcements
At this point, it’s starting to look like a tent! Give yourself a pat on the back. The hardest parts are over! The tasks we still have are small, but they take up a good bit of time.
There are a number of line tie-outs that need to be made and attached to the tent. First off, there are the 4 corner tie-outs which have linelocs attached. To make these, we first need to make an adhesive backed reinforcement patch out of the thicker DCF. I used a 7.5″ circle that I cut into quarters.
To make this circle, I found it easiest to use a form to draw the circle on the fabric (I used a bowl that was about the correct size). Once the circle is drawn, use it as a guide to tape strips of the double sided tape to the DCF side overlapping the circle. Once you’ve taped all the way over the circle with tight tape spacing, cut out the circle by sliding the scissors rather than chomping them. They can be cleaned off using rubbing alcohol to get any adhesive residue off, but be careful not to cut yourself!
Moving to the hardware, the corner tie-outs are made from 5-6″ of 1/2″ grosgrain ribbon with the lineloc threaded onto the middle. I tacked the lineloc onto the middle of the ribbon by sewing a line back and forth on the ribbon about 1/2″ from the folded center.

Next, cut up the 7.5″ adhesive reinforcement patch into quarters and apply to the bottom side of the tent. This will help spread the force out over a much larger area.

Finally, sew the lineloc/grosgrain assembly onto the corner patch. Make sure the lineloc is facing up! I used a squared-x pattern so it had strength all across the seam. I sandwiched the tent between the grosgrain flaps.

The next tie-outs go on the face of each non-zipper panel. I put them in the exact center, but I think they would serve a little better if they were put about 1/3 of the way up the panel instead. You can make your own judgment on that!

Next, we will be making the tie-out reinforcements. I like the look of circles, so that’s what I did for ours. Diamonds would probably look cool too. I found a cup in the house that was close to the right dimensions, about 3″ across, and used that as a pattern to mark 4 circles on the thicker DCF.
I would recommend taping a long strip, about 4″ wide (4 strips of 1″ tape) that you can use to draw and cut all the reinforcement patches out of.

I stuck these patches onto the inside of the tent halfway up the panels. If I were to do it again I would put them a little lower to increase the headroom while sleeping, but this works fine.
For the tie-outs themselves I cut about 4″ sections of grosgrain, folded them in half, and sewed them onto the middle of the circle patch with about a 1.5″ squared-x pattern, leaving a small loop for the cord.

I also added a few semi-circles at the bottom of each panel with small loops that can be staked down in inclement weather.
I put one final circle patch on the inside of the tent right above the zipper, so I can stake down the front with a cord if the doors are open.
Top Cone
The final piece for this puzzle is the top reinforcement cone. All the other tutorials I found didn’t really have a great looking solution that was stitched, so I decided to go full bonded/taped for the top, since sewing around the top is a serious pain with all the bulk of the tent.
There is an outside cone and an inside cone, both bonded on with adhesive. The inside cone is the one that distributes the force from the center pole to the panels of the tent; the outside cone is just to make it look nice. Because the inside cone will always be pushed in/up, I wasn’t as concerned about it being adhesive, since it won’t fail in the same way as bonded tent panels.
Kadi had the idea to make the inside cone a bit of a rounded cone to mate well with our trekking pole handles, and I thought it was an excellent idea. This was done by tracing a small ~2″ circle in the middle of the black reinforcement patch, and cutting 3 equidistant slices out of the outside circle to the middle circle.

To get the fit perfect, I semi-set up the tent and pushed the cut up circle into the top of the tent (without exposing the adhesive yet). The cone formed pretty nicely, so I pinched one seam where it laid, taped it, went back and pinched the next seam, taped it, then repeated again for the third seam.

Once we had taped all the seams, Kadi and I took all the adhesive backing off, flattened all the cone edges we made, and stuck it right up into the peak of the tent. A little nerve-wracking, since you basically get one shot. Be careful!

Next up is the outside cone. This was done by simply cutting a ~7.5″ circle out of the thicker DCF, cutting a slice out of it to the middle, then sliding the one side over the other until it matched the shape of the inside cone.

Finally, we put a bunch of double sided tape on the inside of the cone, peeled off the backing, and stuck it on the outside. We then used single-sided DCF tape to double over all the edges, so wind or water couldn’t get in.

Taping the Seams
The final step is to tape the inside of all the seams, so that the DCF is waterproof again. Once again, this was made much easier with a long table and a partner. Kadi would pull off about 1′ of tape backing at a time, then I would align it and push it down. This took a surprising amount of time!

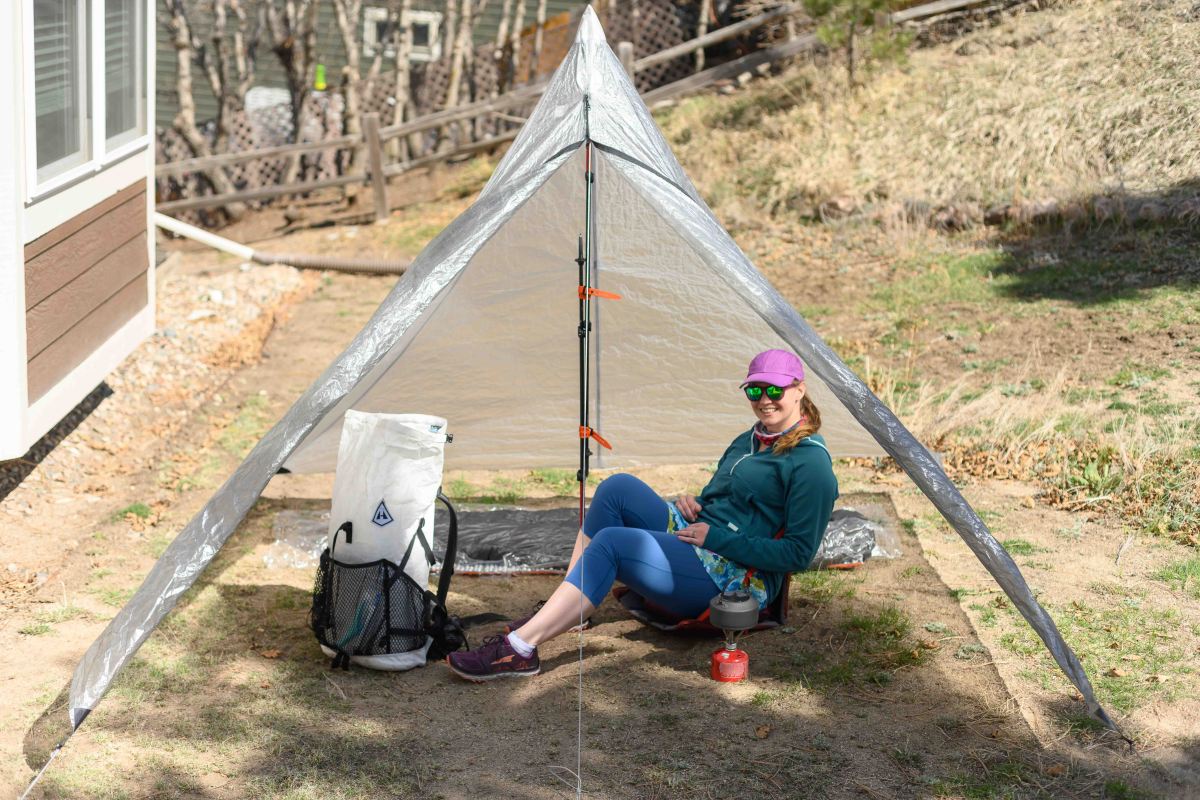
And with that, it’s all done! We really want to take it out on its maiden voyage, but as I’m writing this the Coronavirus is wreaking havoc across the world, and it’s our responsibility to stay in the back yard.

It actually ended up snowing a couple days after we finished it, and I spent the night in it. I stayed perfectly dry and warm, until the sun started melting the condensation on the inside. Single wall tents, eh?


Caveats/still in progress
There are a few caveats with this design. This is my first tent, so I didn’t want to get too complicated. Here are some things that I need to fix, add, or that you could do better:
- No ventilation: I don’t have the skills to add hidden vents at the top. If you can figure it out, please let me know. I kinda want to make another one of these
- Top-hanging: Many ‘mids have features so you can hang them from branches, etc by having cord or ribbon at the peak. I didn’t think of it in time. You could add that I think by making 4 more circle reinforcement patches and adding them on the seams about 8″ down from the top, then running some cord between them.
- Waterproof zipper: I’ve included a waterproof zipper in these instructions, but I did it wrong and put it on inside-out. I will have to make a storm flap. Update Sept 2021: Without the storm flap, I’ve since been in three major hail/rainstorms in the tent, and the water does seep through the zipper, but it runs down the length and drips off the bottom. I don’t think a storm flap is necessary.
- Zipper relief: At the very bottom of the zipper, I need to add a buckle that takes the strain of the wind so that the zipper teeth don’t break.
- Trekking pole for the peak: This couldn’t handle the pointy end of a trekking pole on the inside of the peak, I designed it with the handle part of a trekking pole in mind. You’ll have to figure that one out if you want to do it differently.
- Trekking poles again: To double up trekking poles as I have, you should use ski straps. I’m really intrigued to see if these little guys would work, though we bought the HMG ones because we’re suckers
- Center tie-outs: As I mentioned before, I think it would be a little better if my center panel tie-outs were a little lower, so they pulled out more fabric. I think this would make the inside space a little more usable.
- I think this could be done with just bonding/no sewing, but it would look very different than this tutorial, so this should just be used as reference. (edit 9/2023: check out this great tutorial video for a similar bonded pyramid tent)
- As always, if you were the one who made the tent, you are responsible for your own safety with it’s use. I am making this tutorial to give you knowledge on how to make the tent, but the decisions you make with it are your own and I bear no responsibility.
Additional Resources:
I made a checklist you can print out if you want, check it out here
https://backpackinglight.com/forums/topic/myog-ultamidish-pyramid-tent/
https://www.oregonhikers.org/forum/viewtopic.php?t=5966
http://trailsandtracks.blogspot.com/2011/07/myog-pyramid-tent.html


